
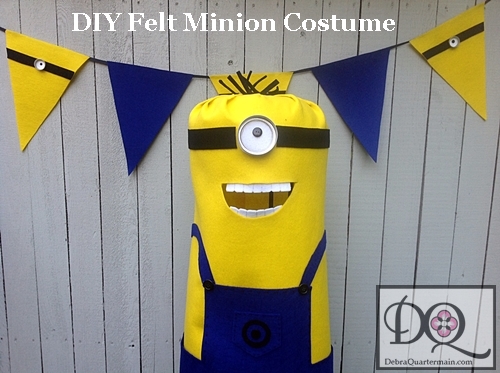
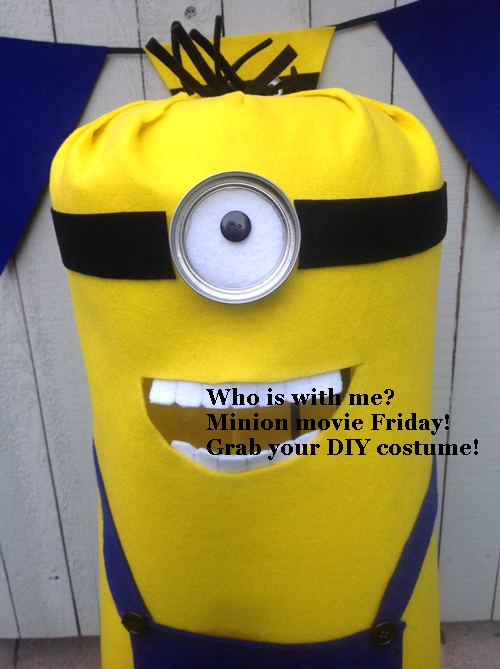
July 10th, the new Minion movie is out tomorrow! Dress up the kids and head out to the theatre this weekend. After checking out several costume ideas on Pinterest, I came up with a simple costume design that would be comfortable and easy to get on and off. This DIY no sew costume will take just 2-3 hours. This is Stuart, want to make a Bob, just make an extra eye.
Here is what you need:
- 1 yd cut by the yard Eco-fi Classicfelt™, Yellow
- 1/2 yd cut by the yard Eco-fi Classicfelt™, Royal Blue
- 9” x 12” craft cuts Kunin Eco-fi Prestofelt™, 1 White, 2 Black
- ¾” Black Button
- 1 Mason jar top
- 11” diameter plastic Bowl
- Glue gun and adhesive sticks
- Scissors, paper, chalk, Sharpie fine and medium point marker, ruler

- Making the Body: Fold felt in half to make a 36” square. (Doubling the felt makes a sturdier main body.) Along one side cut 4” long petal shaped cut by trimming out narrow sections in between each cut. Begin gluing as shown in Photo 1.
- Photo 2. Overlap last petal glued, leave open, this is the back of costume.
- Draw and cut ½” by 12” strips from black felt. Peel off adhesive and fold each piece back on itself making ½” by 6” strips. Knot in center and glue as shown Photo 3.
- Use some sort of stand to flip the costume onto.
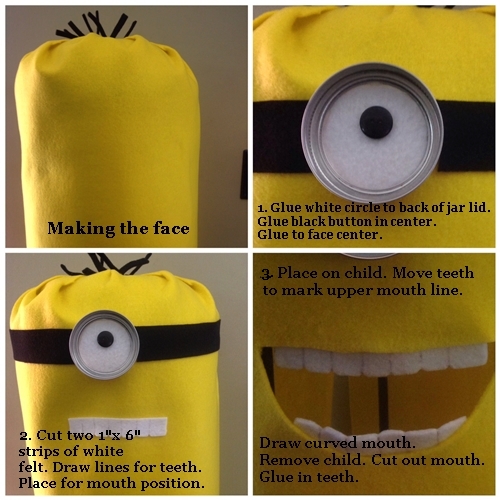
- Making the Face: Use the jar lid as a pattern and draw a circle from white felt. Glue front of felt circle to back of lid. Glue button to white felt. Peel off white felt backing and press on face against bowl underneath. Measure and cut 1 ½” wide strips of black felt. Peel off backing and press firmly in place on either side of eye. Photo 1.
- Photo 2. Remove adhesive from white teeth strips and fold back on itself. This makes for strong teeth. Place one teeth piece on face to roughly mark mouth position.
- Photo 3. The child’s eyes and nose should be visible through the mouth. Draw a curved shape to mouth to create right size for your child. TIP: If the mouth is not in the right position for your child, pad the inside of bowl with foam, gluing in place. This will bring mouth opening up higher.
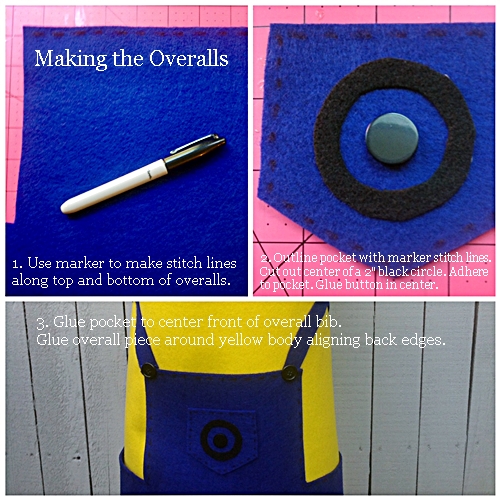
- Making the overalls. Cut a piece of blue felt 18” by 36”. Fold in half and measure across 4” in center and down 6”, mark with chalk. Cut to create bib. Photo 1.
- Cut a 4” square from blue. Fold in half, measure 2” down one side. Cut from this point to center point to create pocket shape. Photo 2.
- Photo 3. Straps will be added in final steps.
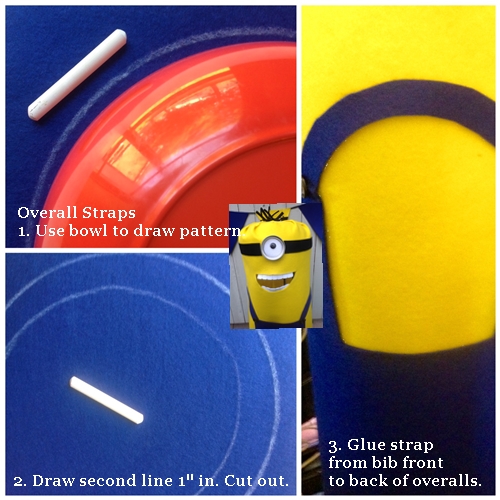
- Bowl used was 11” in diameter to draw pattern. Photo 1
- Cut two straps as shown in Photo 2.
- Photo 3.
- Place on child to get exact measurement for arm holes. Draw a 5” line with chalk. Remove child once again. Cut slit for arm holes.
- The back of the costume can be closed with a hook and loop closure. Trim costume off at bottom for correct length for child. To make a bigger costume a larger bowl can be used with an extra few inches of felt.
If you enjoyed this fun Minion project check out this Pinterest board for more crafty Minion projects.
Follow Debra’s board Minion Crafting on Pinterest.
You can now find an expanded color line of Kunin Eco-fi Classicfelt; Eco-fiPlus™ Premiumfelt and
ShaggiChic non-wovens fabrics in cut by the yard at your local Walmart; please inquire as to what is
available in your area.
Pick up the Yellow and Royal blue to create a Minion of your own!
Thank you for stopping by! Enjoy the movie!
Debra
Oh my gosh this is so fun!!!
AMAZING and it looks SO EASY!!
Adorable!
Totally aDORable!!!!